Welcome back!
In part 1, we set up the groundwork by creating a Google Project and obtaining the necessary OAuth tokens for accessing the Google Calendar API. Now that we have our refresh token in hand, it’s time to put it to work.
So what’s next?
I’ll walk you through integrating this token with Zapier to build an automated subscription process, one that can seamlessly subscribe or unsubscribe your users from a recurring calendar event with just a few clicks. Let’s dive into how we can harness the power of Zapier and a bit of Python to streamline your calendar events.
Defining Your Trigger
Before we go any further, you have to decide what is going to trigger your workflow. I went with something simple; a Google Form. This form is only accessible from our end users and records their email address and they have one simple selection: subscribe or unsubscribe from the recurring event.
Once they submit the form, Zapier is listening for this trigger to start my workflow.
Here is a high level view of the completed workflow:
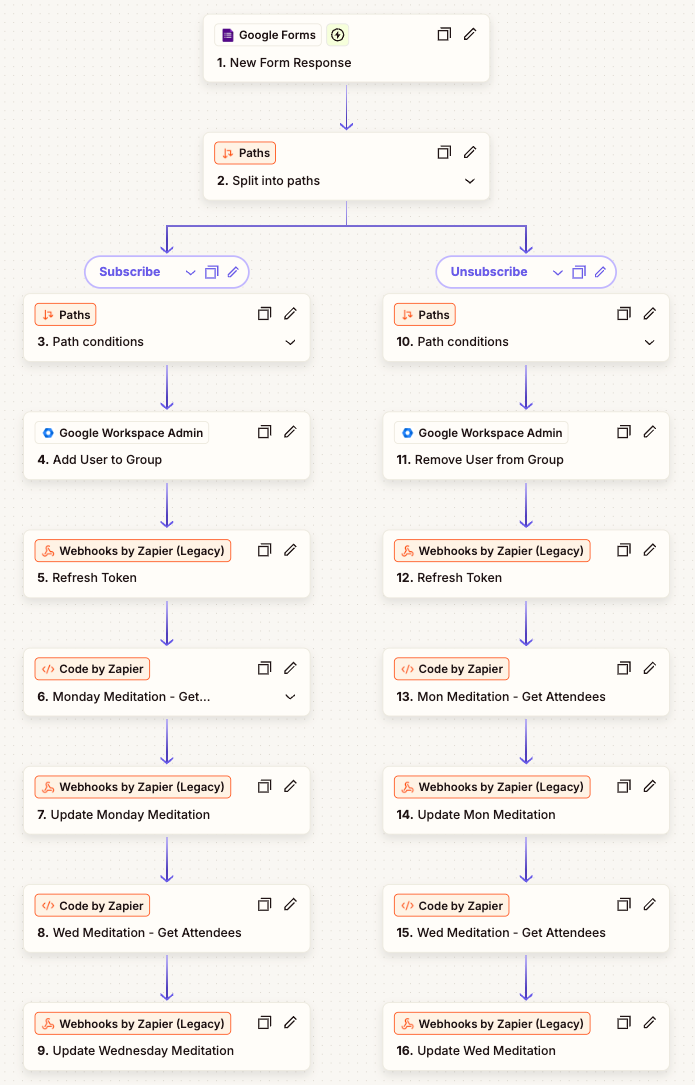
I use two different paths: One is if they subscribe, the other unsubscribe.
Subscribe Path
Here we are going to do several things:
- (Optional) Add users to a Google Group.
- Refresh our Token
- Use Python to create a new raw JSON payload
- Update the Calendar Event.
Adding the Users to a Google Group
I still use a Google Group but this isn’t necessary. I liked the idea of still maintaining an easy record of everyone subscribed so that we can make sure everything is working properly. I’ll eventually remove this at some point though.
Refresh Your Token
You’re going to want to add a Webhooks by Zapier action here.
You’ll want to set this up as a POST event.
The URL is going to be https://oauth2.googleapis.com/token. The Payload Type is Form and the data you’re passing is the following:
client_idclient_secretgrant_typerefresh_token
You can leave all other settings as default.
Here is an example:

After you’ve got everything set, go ahead and test your action. If you’ve used the correct information from your Google Cloud Project, you’ll get something that looks like this:
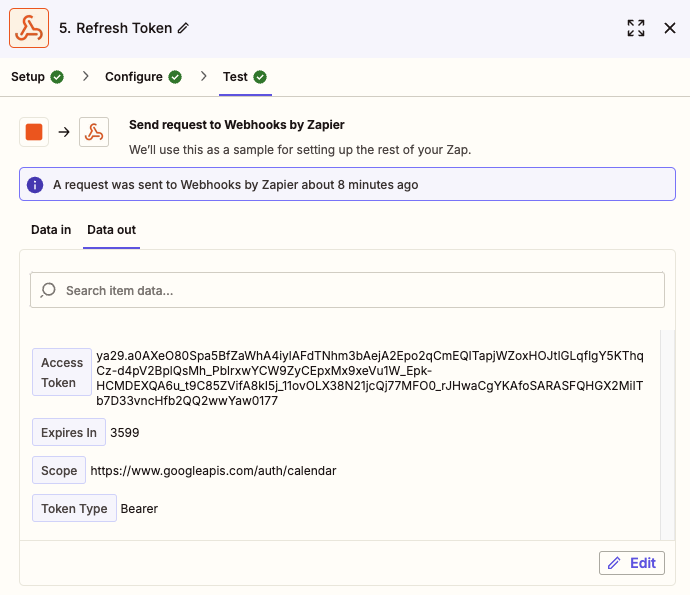
Now you have your newly refreshed access token that will be valid for 1 hour.
Creating your JSON Payload
Now that we have our new token, we are going to write some basic Python that will make our API call for us and then create a new JSON payload we’ll use to Patch the calendar event.
Add a new action: Code by Zapier.
You are going to pick Run Python as your action event. Next, you’ll define your input data. I used the names auth_token and attendee. The auth token is mapped to the access token created in the previous step and the attendee is mapped to the user who submitted the form.
Below you’ll find the Python code. You’re going to need two items for this code:
- Calendar name (user’s email address)
- Event ID
The Event ID is very important and you’ll need to come prepared with this. This post isn’t going to explore obtaining this key but you can use a tool like GAM to grab it or something like GAT+. You can also use the newly refreshed Token to make an API call and grab this information prior to this step and pass the results into this code or just merge it all together.
import requestsimport json
def main(): # Define the Google Calendar event URL you want to GET url = "https://www.googleapis.com/calendar/v3/calendars/{CALENDAR-EVENT-OWNERS-EMAIL-ADDRESS}/events/{EVENT-ID}"
# Retrieve inputs from Zapier token = input_data.get("auth_token", "").strip() attendee_email = input_data.get("attendee", "").strip()
# Set up headers with Bearer token headers = { "Authorization": "Bearer " + token, "Content-Type": "application/json" }
# GET the current event data response = requests.get(url, headers=headers) response.raise_for_status() event_data = response.json()
# Build a dictionary of current attendees (ignoring declined ones) attendees_dict = {} for attendee in event_data.get("attendees", []): if attendee.get("responseStatus", "").lower() == "declined": continue email = attendee.get("email", "") if email: attendees_dict[email.lower()] = attendee
# Insert or update the new attendee if provided if attendee_email: attendees_dict[attendee_email.lower()] = { "email": attendee_email, "responseStatus": "accepted" }
# Build patch data with updated attendees and no sendUpdates patch_data = { "attendees": list(attendees_dict.values()), "sendUpdates": "none" }
# Convert patch data to JSON and return it for subsequent Zap steps return {"raw_attendees_json": json.dumps(patch_data)}
output = main()Here is what the code does:
- Retrieves the input data from Zapier that you’ve defined
- Builds the GET request with endpoint URL and Headers
- Grabs the Attendees array
- Removes users from the array if their
resposneStatus: 'declined' - Adds the user who subscribed to the array and puts their
responseStatus: 'accepted' - adds
sendUpdates: 'none' - Rebuilds the array and puts it into raw JSON
After you’ve submitted this code, you’ll get something like this as your output:
{"attendees": [{"email": "[email protected]", "organizer": true, "self": true, "responseStatus": "accepted"}, {"email": "[email protected]", "displayName": "Google Group", "responseStatus": "accepted"}, {"email": "[email protected]", "responseStatus": "accepted"}, {"email": "[email protected]", "responseStatus": "accepted"}], "sendUpdates": "none"}This output will be labeled Raw Attendees Json and is ready for your next action.
Updating the Calendar Event
Now that we have our payload ready, we do another Webhooks by Zapier action.
This time we use the PATCH method and the same endpoint URL we used in our code above:
https://www.googleapis.com/calendar/v3/calendars/{CALENDAR-EVENT-OWNERS-EMAIL-ADDRESS}/events/{EVENT-ID}
This time we set our data with the output Raw Attendees Json from the previous action.
Set your Headers with the following information:
Content-Type: application/jsonAuthorization: Bearer {TOKEN HERE}
You can use the same token we got earlier from step 2 above since it will still be active.
Once you’ve set this and submit the command, the event will be fully updated with everyone being marked as “accepted”.
Unsubscribe Path
This one is nearly identical with a few tweaks. I recommend just copying your actions from the subscribe path and moving them over.
We are going to adjust our Python a little. The goal here is to remove the form submitter from the attendees array:
import requestsimport json
def main(): # Define the Google Calendar event URL you want to GET url = "https://www.googleapis.com/calendar/v3/calendars/{CALENDAR-EVENT-OWNERS-EMAIL-ADDRESS}/events/{EVENT-ID}"
# Retrieve inputs from Zapier token = input_data.get("auth_token", "").strip() attendee_email = input_data.get("attendee", "").strip()
# Set up headers with Bearer token headers = { "Authorization": "Bearer " + token, "Content-Type": "application/json" }
# GET the current event data response = requests.get(url, headers=headers) response.raise_for_status() event_data = response.json()
# Build a dictionary of current attendees (ignoring declined ones) attendees_dict = {} for attendee in event_data.get("attendees", []): if attendee.get("responseStatus", "").lower() == "declined": continue email = attendee.get("email", "") if email: attendees_dict[email.lower()] = attendee
# If attendee is provided and is in the list, remove it completely if attendee_email: attendee_email_lower = attendee_email.lower() if attendee_email_lower in attendees_dict: attendees_dict.pop(attendee_email_lower)
# Build patch data with updated attendees and no sendUpdates patch_data = { "attendees": list(attendees_dict.values()), "sendUpdates": "none" }
# Convert patch data to JSON and return it for subsequent Zap steps return {"raw_attendees_json": json.dumps(patch_data)}
output = main()Now you have a new raw JSON payload that has removed the user from the attendee list.
Updating the Calendar Event
Last step is to create another Webhooks by Zapier action using the PATCH method. This should be very similar to the other action in the Subscribe path. All you’ll need to do is update the data field with the new raw JSON output from the previous step.
That’s it!
You’re done with your Zap! Time to publish.
There are some obvious places where this workflow could be improved. For instance, I could move the Token Refresh action outside the two paths but for now this works and until I need to jump back in and modify it, it will probably stay like this.
Let me know if this worked for you and if you’d like to see another post on how to get the Event ID that you’ll be manipulating in this workflow.
Make sure you Subscribe to my Substack to get the latest updates from me.
Until next time!