How it Started…
I recently had a request that I thought would have a very simple solution:
“Can you create an easy way for employees to be able to subscribe or unsubscribe from a series of recurring calendar events for a weekly Health & Wellness class?”
Sure! The first thing that popped into my head was to just create a Google Group and have the event owner invite that group. If people joined the group they’d get the invites and if they left the events would fall from their calendar. Wrong!
For some reason, Google has decided to not make this process easy. You’d think it would be that simple but it isn’t. The problem: if someone joined the group they’d get the invites like expected but if for some reason they decided to take a break from the events and left the group, the events stayed since they were accepted. What ended up happening is that the end user would just delete the event from their calendar altogether. After some time, if that user wanted to join in on these sessions again, they’d join the group but the events wouldn’t come back. Why? Because if you delete a calendar event(s) it marks you as ‘declined’ going forward and that information is stored in the event until the end of time.
So, what can we do about that? To overcome these limitations, I was able to build a simple subscribe/unsubscribe mechanism using Google Forms, Google Cloud Apps, Zapier, Python, and the Google Calendar API. This allowed users to add (or remove) the recurring events from their calendars whenever they wanted, reducing double bookings and also completely getting rid of the invite emails.
Let’s jump in and create the ultimate event subscription process!
Step 1: Creating & Configuring a Google Project
Prerequisites:
- Have Super Admin access to Google
- Google Cloud access
Go to https://console.cloud.google.com/ and create your project that you’ll be using for this solution.
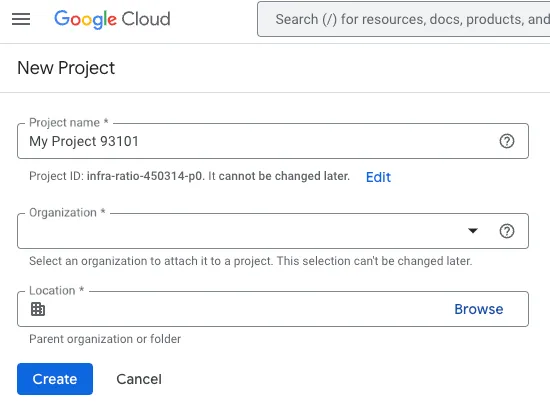
You can (and should) name this project something memorable. I used “Zapier-Calendar”.
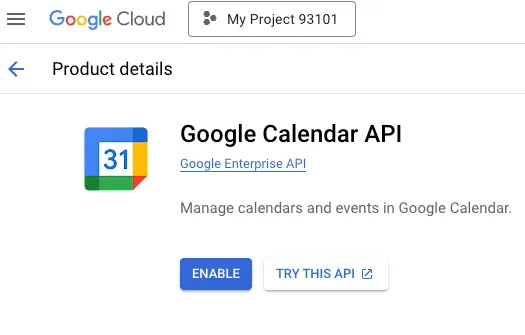
Once your project is created, you’ll want to add the appropriate APIs. Go to the “APIs & Services” settings and then “Enable APIs & services”. From here you’ll search for “Google Calendar API” which is under the “Google Enterprise API” section.
Once you have the API enabled, you will go over to “OAuth consent screen”.

Select “External” since this will allow you to limit the consent screen to a specific test user. Then hit “Create”
The only information you need to provide for the App is the name, user support email, and the developer contact information. Once you do that, you’ll save and continue.
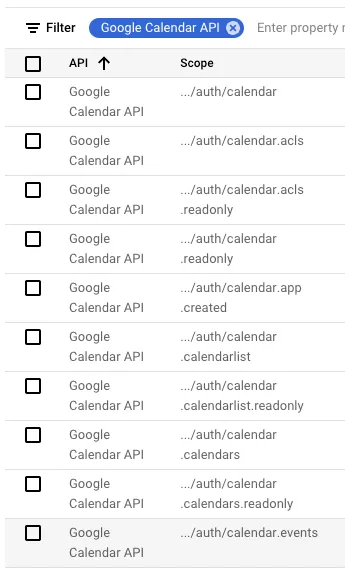
Next, you’ll add your scopes. Only add scopes for the Calendar API. It is important to only give permissions based on what you’re needing to accomplish with the API, never over do it.
Once the scopes are selected, Save and continue to the last part. Set your test user. This is the user you’ll be using to authorize the application. I made sure to use my Super Admin account for the authorization.
Now, we are going to head over to the “Credentials” tab.
You’ll create a new credentials “OAuth client ID” and select “Web application” as application type.
Set your “Authorized redirect URIs” to https://localhost:8080 and then select Create.
You’ll be presented with your new credential.
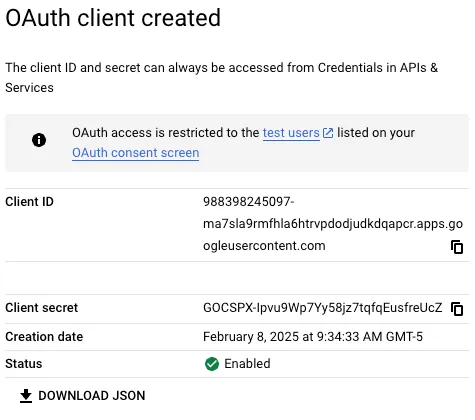
The important information here is going to be the Client ID and Client secret. We’ll need this information when getting our Access Token and Refresh Token.
Step 2: Getting Your API Token
I used the documentation over on Google’s Developer Documentation on Authorization to get through the next steps. I also utilized Postman. If you don’t have an account, you can create a free one at Postman.com. It is great for creating your API calls.
Once in Postman, you can create a new API request and set it to GET. The Endpoint URL you’ll be using is https://accounts.google.com/o/oauth2/v2/auth
Under Params, you’ll set the following information for each Key and Value:
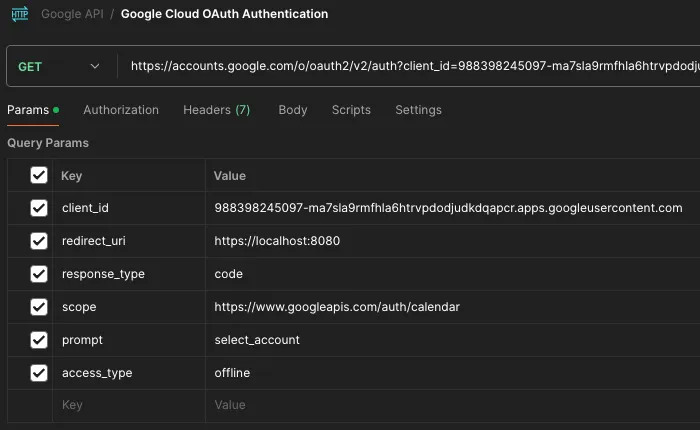
This is where you’ll be using your Client ID we got in the previous step. Unfortunately, Postman doesn’t allow you to just send this request and receive the sign-in screen for Google. To get around this, simply copy the URL that Postman has created for you with all the parameters and then paste it in a new window.
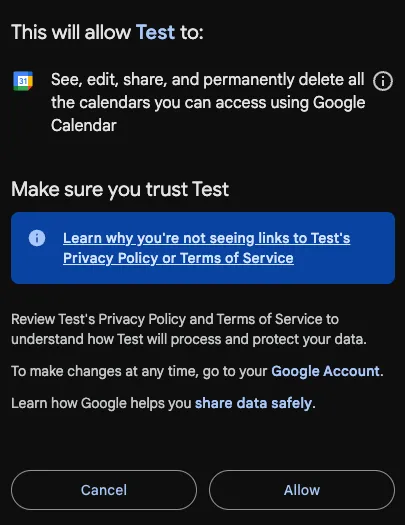
You’ll be taken to a Google login screen where you can select your Super Admin user and then sign-in. From here you’ll be presented with a screen to give access to your new app.
Once you click allow, you’ll be redirected to a blank page. THIS IS NORMAL. It attempted to redirect you to https://localhost:8080, which you probably are not using so you’ll get a “This site can’t be reached” error. But you now have the important information. Copy the URL in the browser and let’s head back over to Postman.
Create a new API request document and paste the URL in the GET section. You’ll see that it defines your parameters for you. The one we are focused on is the “code” key under Params.
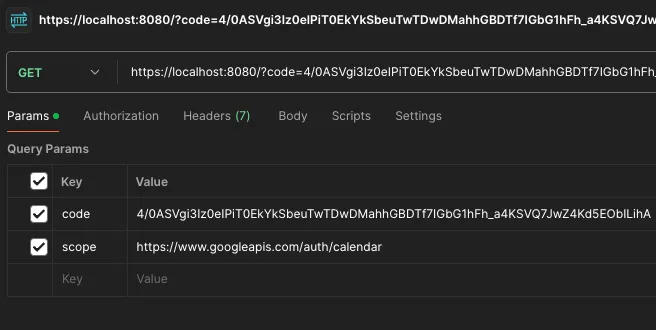
Copy the code value and let’s make one more API Request document in Postman.
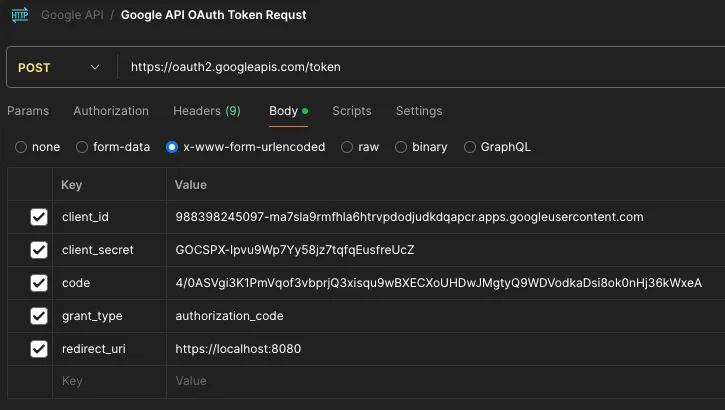
You are going to change your API request from GET to POST. The Endpoint you’ll use this time is https://oauth2.googlapis.com/token
You are also going to need your Client ID and Client secret from Step 1 in addition to the code we just got.
Select the “Body” sub tab for this request and make sure you set it to x-www-form-urlencoded. Now create your keys and values.
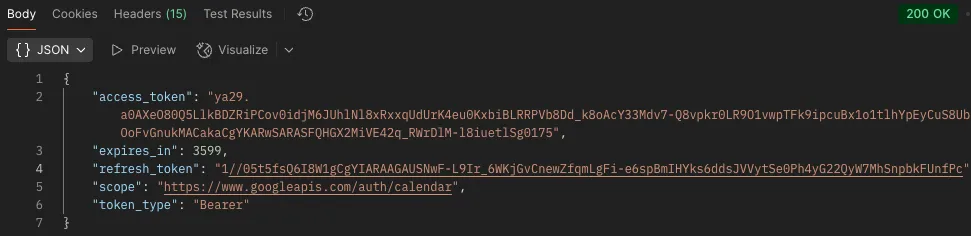
Now select “Send” and you should get an output that looks like this:
Conclusion
You made it! Now you have an OAuth token you can use to make some pretty nifty API calls.
While my guide is focused on the Calendar API, you could technically set up any API scopes and add them as needed. You’ll want to make sure you update your scopes in the first URL we created and they must be in a space-delimited list to work.
But be careful, it is best to only give the permission that are necessary to complete your task. The tokens you create are very powerful tools and if they fall into the wrong hands, you need to make sure your your attack surface is limited.
Stay tuned for the second part of this guide where I’ll show you how I used Zapier and a little Python to automate the subscription process for these calendar events.
Make sure you Subscribe to my Substack to get the latest updates from me.